01 为什么寻找另一种磨皮方式
在我的 Adobe 时代,曾经拍过一些人像照片。人像后期经常会涉及磨皮。虽然我一直对磨皮本身兴趣不大,但从商业拍摄的要求,或者满足拍摄对象的期待来看,这确实是一项值得掌握的技能。我记得当年是使用 Noise Ninja 来处理这类问题的。
近期我想重新拾起这门技艺。因为人像几乎是我们绕不开的摄影题材。但因为我早已脱离 Adobe 阵营,选择一款合适的软件成为需要考虑的问题。
在人像后期中,磨皮一直是一个需要谨慎处理的环节。我希望改善皮肤的瑕疵和不均匀感,但不想让人物失去真实的皮肤质感。毛孔、细小纹理,以及眼睛、眉毛和嘴唇的清晰度,都应该尽可能保留下来。
之前,我曾考虑学习 Affinity Photo 原生滤镜的高低频分离来实现磨皮效果,但一来有些复杂,二来总感觉不够完美(也可能是我操作不够复杂:D)。于是我转而寻找另一种可能:有没有一套工具,既能完成皮肤修饰,又能让我在后期过程中拥有足够的控制权?
通过与 AI 的讨论研究,一个叫做 G’MIC 的开源软件落入眼帘。呃,是的,我喜欢先找开源免费的东西,既然有我们为何不尝试一下呢?
ENGLISH
During my Adobe years, I took some portraits. Portrait retouching often involves skin smoothing. Although I have never been especially interested in skin retouching, it is a useful skill to have, whether a commercial assignment requires it or the subject asks for it. I remember using Noise Ninja for this kind of work back then.
Recently, I wanted to pick up the skill again. Portraits are a subject we can hardly avoid in photography. But since I left the Adobe ecosystem long ago, choosing suitable software became part of the problem.
Skin retouching calls for care. I want to improve blemishes and unevenness without making people lose their natural skin texture. Pores, fine texture, and the definition of the eyes, eyebrows, and lips should be preserved as much as possible.
I had considered learning frequency separation with Affinity Photo's native filters, but it seemed complicated and never quite convincing (perhaps I simply had not made the process complicated enough :D). So I looked for another possibility: could I find a tool for skin retouching that still gave me enough control over the process?
After discussing and researching the options with AI, I came across an open-source project called G’MIC. Yes, I tend to look for open-source and free tools first. If one is available, why not give it a try?
02 G’MIC 是什么
G’MIC 是一个开源的图像处理项目,提供了大量图像处理算法和滤镜。它既可以通过命令行使用,也提供了图形界面 G’MIC-Qt。
让我感兴趣的是它的滤镜数量和处理方式。
在我安装的 G’MIC-Qt 4.0.5 中,可以看到 645 个可用滤镜,涵盖色彩、细节、修复、纹理、黑白处理等多个类别。
当然,滤镜多并不意味着每一个都适合日常摄影。
对我而言,最重要的不是把这些滤镜全部研究一遍,而是找到几个真正能够融入现有工作流的工具。
这次,我从人像皮肤修饰开始。
ENGLISH
G’MIC is an open-source image-processing project that offers a large collection of algorithms and filters. It can be used from the command line and also provides a graphical interface called G’MIC-Qt.
What caught my attention was the number of filters and the range of ways to process images.
In the G’MIC-Qt 4.0.5 installation I used, there were 645 available filters across categories such as color, detail, repair, texture, and black-and-white processing.
Of course, having many filters does not mean that every one of them belongs in an everyday photography workflow.
The important thing for me was not to study every filter, but to find a few tools that could fit into the workflow I already use.
This time, I started with portrait skin retouching.
03 安装独立版 G’MIC-Qt
最初,我尝试在 Affinity Photo 中使用 G’MIC 插件,但实际测试发现,该插件在 Affinity Photo 中暂时无法打开 16-bit 图像。根据相关资料,G’MIC 本身支持 16-bit 图像,因此我决定尝试独立版 G’MIC-Qt,希望找到一条更适合自己工作流的方案。
因为我使用的是 Mac,所以下面仅列出 macOS 系统中的安装步骤(我目前使用的 macOS 版本是 27.0.1)。如果下载或更新过程中遇到网络问题,可以尝试更换网络环境或使用可用的网络代理。
- 首先安装 MacPorts(一种与 Homebrew 类似的软件包管理工具)。在 MacPorts 官网 下载对应的安装包,打开后按照提示完成安装即可。
- 安装后,打开终端并输入 port version。
- 如果返回类似 Version: 2.12.6 的信息,就说明安装成功。
- 然后输入 sudo port selfupdate,更新 MacPorts 的软件目录。
- 更新完成后,输入 port search gmic,返回结果中应该包含类似 gmic-qt 的条目。
- 如果看到 gmic-qt,就输入 sudo port install gmic-qt 进行安装。这一步还会安装许多依赖项,因此可能需要一些时间。
- 安装结束后,在终端中输入 gmic_qt 启动程序。注意,命令中间使用下划线,而不是连字符。
ENGLISH
At first, I tried using the G’MIC plug-in in Affinity Photo. In my tests, however, the plug-in would not open 16-bit images in Affinity. The documentation indicated that G’MIC itself supports 16-bit images, so I decided to try the standalone G’MIC-Qt and look for a workflow that suited me better.
I use a Mac, so the steps below are for macOS only (my current version is 27.0.1). If you run into network issues during installation or updates, try a different network connection or a suitable proxy.
- First, install MacPorts, a package manager similar to Homebrew. Download the installer from the MacPorts website, open it, and follow the prompts to finish installation.
- After installation, open Terminal and enter port version.
- If it returns something like Version: 2.12.6, MacPorts is installed successfully.
- Then enter sudo port selfupdate to update the MacPorts package index.
- When the update finishes, enter port search gmic. The results should include something like gmic-qt.
- If you see gmic-qt, install it with sudo port install gmic-qt. This will install many dependencies and may take a while.
- When installation is complete, enter gmic_qt in Terminal to launch it. The command uses an underscore, not a hyphen.
04 一个实际问题:如何处理 TIFF
滤镜本身并不是这次探索中唯一需要解决的问题。
我的照片通常在 DxO PhotoLab 中完成 RAW 解码和基础调整,然后进入 Affinity Photo 做进一步处理。因此,中间文件的格式和位深也很重要。
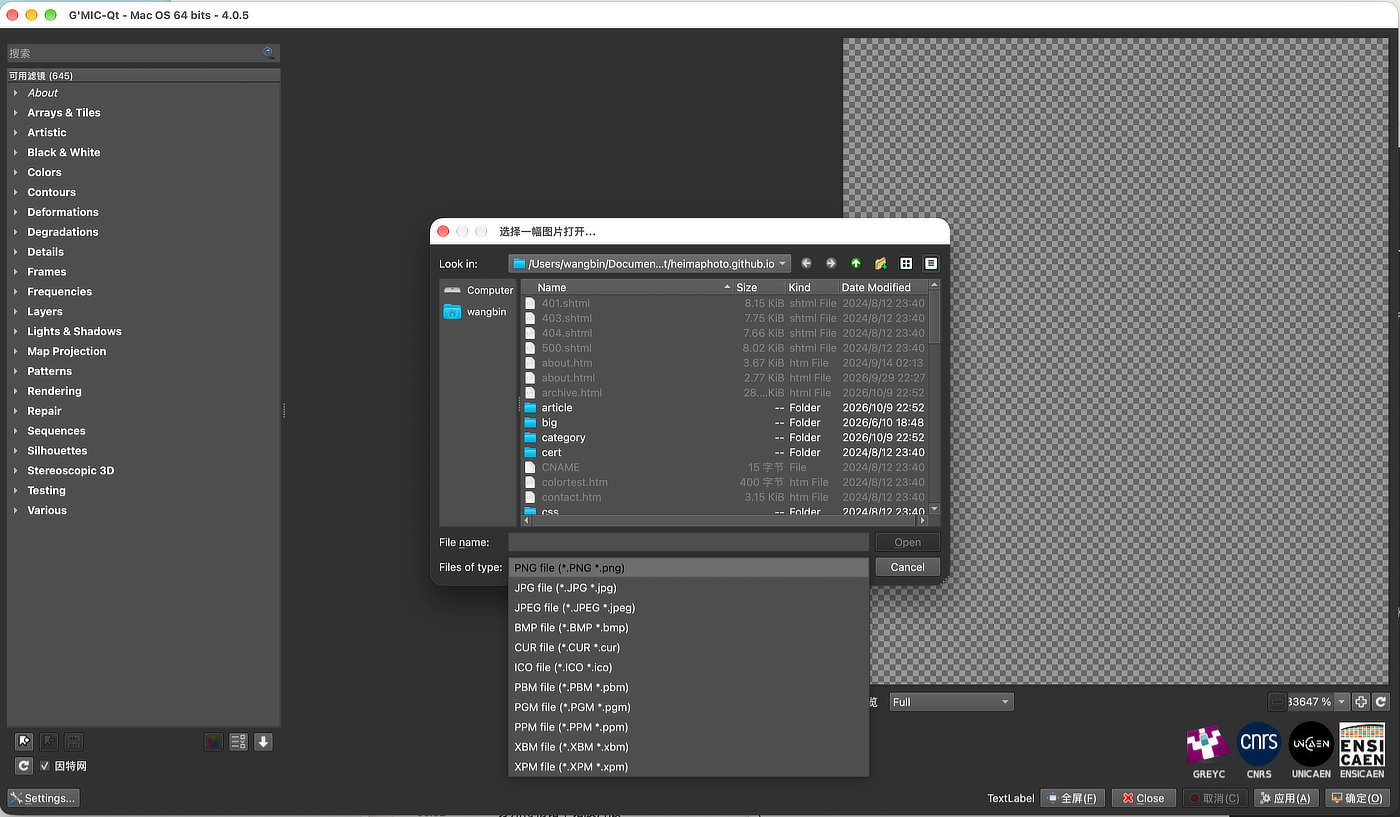
一开始,我尝试直接将 TIFF 文件导入独立版 G’MIC-Qt,却遇到了问题。无论通过文件选择窗口,还是尝试直接把 TIFF 文件路径传给程序,都没有成功。经过一番尝试,我发现对于目前使用的独立版 G’MIC-Qt,采用 PNG 中间文件是更方便的方案。PNG 支持 16-bit RGB,因此可以作为高位深图像的中间格式。不过,实际处理时仍需要确认导出设置和处理结果的位深。
我将照片从 Affinity Photo 导出为 16-bit PNG,再交给 G’MIC-Qt 处理。
ENGLISH
The filters themselves were not the only problem I needed to solve during this exploration.
I usually develop RAW files and make basic adjustments in DxO PhotoLab, then move them into Affinity Photo for further editing. The format and bit depth of the intermediate file therefore matter too.
At first, I tried importing TIFF files directly into the standalone G’MIC-Qt, but could not get it to work, either through the file chooser or by passing the file path to the program. After some trial and error, I found that PNG was a more convenient intermediate format with the standalone version I was using. PNG supports 16-bit RGB and can therefore carry high-bit-depth images, though it is still important to check the export settings and the bit depth of the processed result.
I exported the photo from Affinity Photo as a 16-bit PNG, then processed it in G’MIC-Qt.
05 Easy Skin Retouch:第一次测试
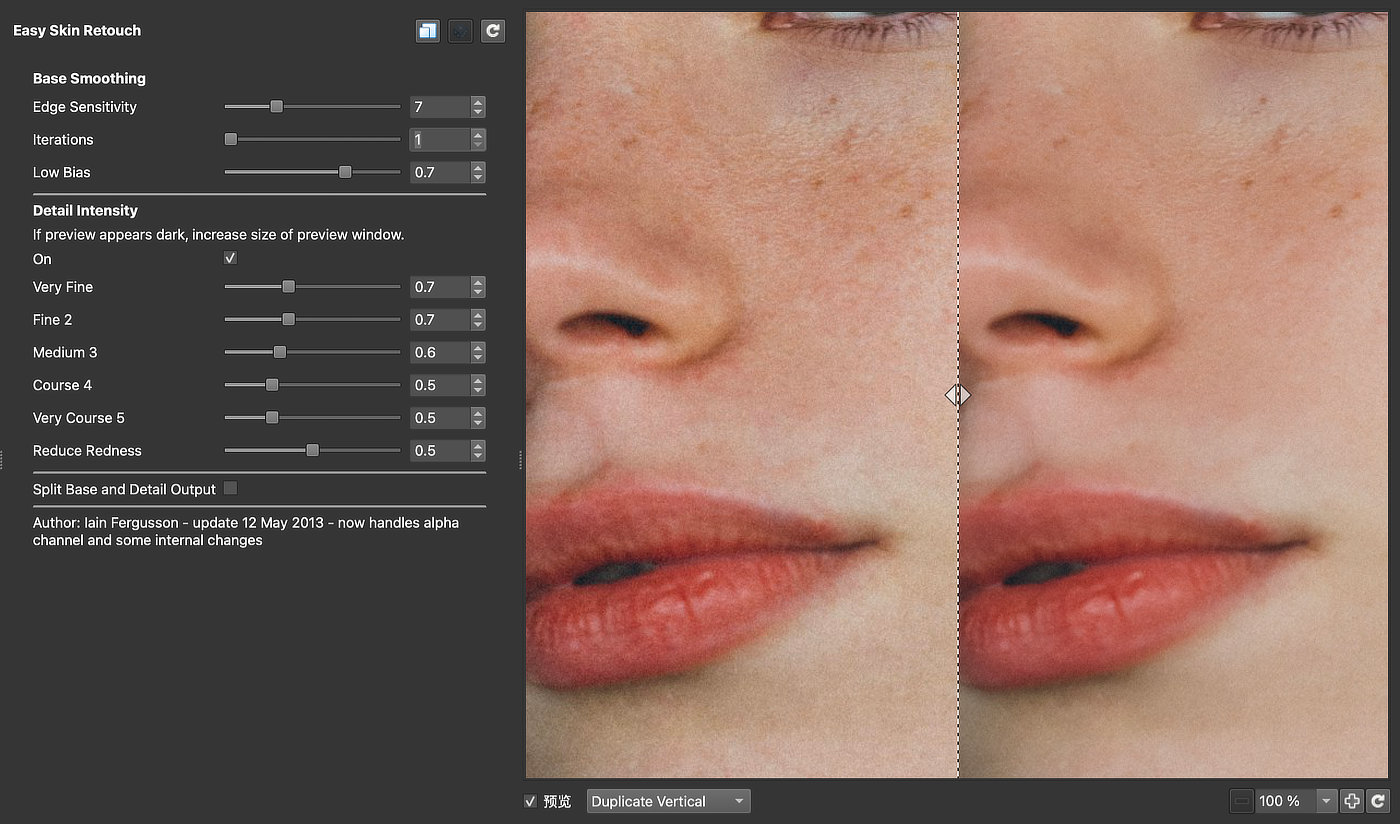
在滤镜搜索框中输入 skin,很快就能找到一个名为 Easy Skin Retouch 的滤镜。
它提供了基础平滑、细节强度和降低红色等控制选项。
与简单的模糊处理不同,它允许分别调整不同尺度的细节。这意味着,我们不必只用一个强度参数决定整张脸的平滑程度。
第一次测试,我直接使用默认参数。
效果确实有效:额头和脸颊的细节变得柔和,部分皮肤颗粒也被压低了,眼睛、眉毛和嘴唇则基本保持清晰。
但默认效果并不一定适合所有照片。
接下来,我开始逐项调整参数。
经过几轮尝试,我得到了一套暂时满意的参数:
- Edge Sensitivity: 7 (边缘敏感度)
- Iterations: 1 (迭代次数)
- Low Bias: 0.7 (低偏置)
- Very Fine: 0.7 (极细节)
- Fine 2: 0.7 (细节层级 2)
- Medium 3: 0.6 (中等细节层级)
- Coarse 4: 0.5 (粗尺度细节)
- Very Coarse 5: 0.5 (极粗尺度细节)
- Reduce Redness: 0.5 (降低泛红)
注:Low Bias 暂按字面译为“低偏置”;目前尚未找到足够可靠的资料来确认该参数的具体算法含义。
以上参数是我针对当前测试照片进行几轮调整后得到的暂定设置,并不是适用于所有人像的通用预设。不同照片的皮肤状态、光线和输出尺寸都可能影响最终效果。
对我而言,这个滤镜最有价值的地方,是它提供了足够多的控制选项,让我可以通过实际对比逐渐找到合适的效果,而不是只依赖一个强度滑块。
ENGLISH
Typing “skin” into the filter search box quickly brings up one called Easy Skin Retouch.
It offers controls for basic smoothing, detail strength, and reducing redness.
Unlike a simple blur, it lets you adjust detail at different scales. That means we do not have to rely on a single strength setting to determine how smooth the entire face becomes.
For my first test, I used the default settings.
The effect was clear: details on the forehead and cheeks became softer, and some fine skin texture was smoothed out, while the eyes, eyebrows, and lips remained mostly sharp.
But the default effect will not suit every photograph.
I then began adjusting the settings one by one.
After several rounds, I arrived at a set of settings that I am temporarily happy with:
- Edge Sensitivity: 7
- Iterations: 1
- Low Bias: 0.7
- Very Fine: 0.7
- Fine 2: 0.7
- Medium 3: 0.6
- Coarse 4: 0.5
- Very Coarse 5: 0.5
- Reduce Redness: 0.5
Note: “Low Bias” is translated here literally as “低偏置”; I have not found sufficiently reliable documentation to confirm the parameter’s precise algorithmic meaning.
These are provisional settings I arrived at after several rounds of adjustment on the test photo. They are not a universal preset for every portrait. Skin, lighting, and output size can all affect the final result.
For me, the filter’s greatest value is the range of controls it provides. By comparing results, I can gradually find an appropriate look instead of relying on a single strength slider.
06 真正有用的部分:把磨皮交给图层蒙版
完成滤镜测试后,我想到一个更符合自己习惯的处理方式。
与其要求 G’MIC 一次性完成整张照片的修饰,不如让它只负责生成一个磨皮版本,再回到 Affinity Photo 中决定效果究竟应该出现在哪里。
具体做法很简单:
- 保留一份原始照片。
- 将 G’MIC 处理后的照片作为另一层。
- 将两张照片对齐,确保尺寸和位置一致。
- 利用图层蒙版控制两张照片的显示范围。
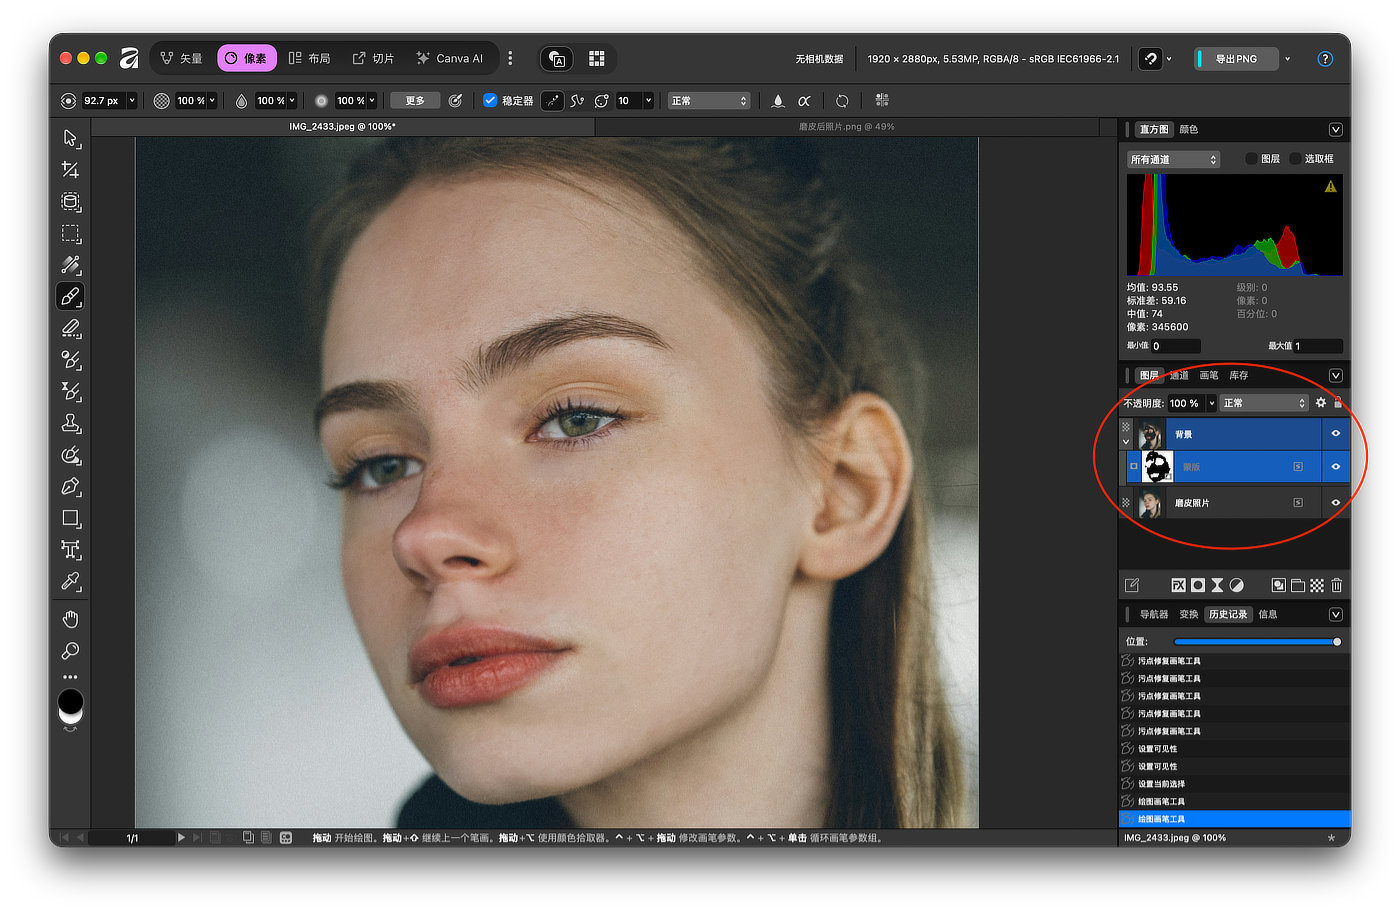
我更喜欢将 G’MIC 处理后的照片放在底层,原始照片放在上层。
这样,只需要给原始照片添加一个白色蒙版,再使用黑色画笔涂抹需要磨皮的皮肤区域,就能让下方的 G’MIC 处理结果显露出来。
黑色区域显示下层的磨皮结果,白色区域保留上层原图,灰色则用于混合两者。
这个方法的优点在于,磨皮与局部控制被分成了两个独立的步骤。
G’MIC 负责生成处理结果,Affinity Photo 负责决定效果的作用范围。
如果脸颊需要适度柔化,可以只处理脸颊;如果眼睛、眉毛、嘴唇或头发需要保持原有细节,也可以直接保留原图。
即使最终发现磨皮过重,也不必重新处理整张照片。通过蒙版和图层不透明度,就能进一步调整效果。
对我而言,这种方式比追求一个能够自动完成所有工作的插件更有吸引力。
ENGLISH
After testing the filter, I thought of a way to work that better suits my habits.
Instead of asking G’MIC to retouch the entire photo in one go, I can let it generate a smoothed version, then return to Affinity Photo to decide exactly where the effect should appear.
The process is simple:
- Keep a copy of the original photo.
- Place the G’MIC-processed photo on a separate layer.
- Align the two photos, making sure their dimensions and positions match.
- Use a layer mask to control which parts of each photo are visible.
I prefer to put the G’MIC-processed photo on the bottom layer and the original photo above it.
Then I only need to add a white mask to the original layer and paint with a black brush over the skin areas I want to retouch. This reveals the G’MIC result below.
Black areas reveal the smoothed layer below, white areas preserve the original layer above, and gray blends the two.
The advantage is that skin smoothing and local control become two separate steps.
G’MIC generates the processed result; Affinity Photo determines where it is applied.
If the cheeks need a little softening, I can work only on the cheeks. If the eyes, eyebrows, lips, or hair need to retain their original detail, I can leave them untouched.
Even if I later find the smoothing too strong, I do not need to process the whole photo again. I can adjust the mask and layer opacity instead.
For me, this approach is more appealing than looking for a plug-in that automatically does everything.
07 磨皮之后,还需要锐化吗?
皮肤修饰完成后,照片的其他细节仍然需要得到妥善处理。
我使用的 Nik Collection 中有一个滤镜叫作 Nik Sharpener Output,它主要用于针对最终输出进行锐化。
因此,我倾向于将它安排在后期流程的最后阶段。
这里也需要注意:锐化并不意味着对整张照片施加越强的效果越好。如果皮肤已经经过平滑处理,再对其进行过度锐化,就可能重新强调皮肤纹理和颗粒。
我的思路是先完成皮肤修饰,再检查最终输出的效果,必要时利用蒙版控制锐化的作用范围。
如果照片需要缩小尺寸,我也会在最终尺寸确定后再进行输出锐化。
这样,磨皮负责控制皮肤质感,锐化负责满足最终输出的清晰度要求,两者各自承担不同的任务。
ENGLISH
After retouching the skin, the other details in the photo still need attention.
I use a filter in Nik Collection called Nik Sharpener Output, which is designed for sharpening the final output.
So I prefer to place it at the very end of the editing workflow.
It is worth remembering that sharpening does not mean applying a stronger effect to the whole image. If the skin has already been smoothed, excessive sharpening may emphasize its texture and grain again.
My approach is to finish the skin retouching first, then check the final output and, if needed, use a mask to control where sharpening is applied.
If the photo needs to be resized, I also wait until the final dimensions are set before applying output sharpening.
In this way, smoothing manages skin texture, while sharpening serves the clarity needs of the final output. Each has a different job.
08 一套仍在完善的工作流
经过这次测试,我初步形成了这样一条处理流程:
DxO PhotoLab → Affinity Photo → G’MIC-Qt → Affinity Photo → Nik Sharpener Output
其中:
- DxO PhotoLab 负责 RAW 解码、基础调整和必要的降噪。
- Affinity Photo(第一次进入)负责导出 16-bit PNG 中间文件。
- G’MIC-Qt 负责生成皮肤修饰结果。
- Affinity Photo(第二次进入)负责利用图层、蒙版和不透明度进行局部控制。
- Nik Sharpener Output 负责最终输出锐化。
中间文件使用 16-bit PNG,以便在独立版 G’MIC-Qt 与 Affinity Photo 之间传递照片。
当然,这并不意味着每张照片都需要经过所有步骤。对于不需要人像修饰的照片,原有流程仍然足够。
而且,目前我只重点测试了 Easy Skin Retouch,还没有系统研究 G’MIC 的其他滤镜,也没有对不同人像、不同输出尺寸进行完整比较。
所以,这更像是一次有实际成果的工作流探索,而不是最终结论。
ENGLISH
After these tests, I have formed a preliminary workflow:
DxO PhotoLab → Affinity Photo → G’MIC-Qt → Affinity Photo → Nik Sharpener Output
- DxO PhotoLab handles RAW development, basic adjustments, and any necessary noise reduction.
- Affinity Photo is used to export an intermediate 16-bit PNG.
- G’MIC-Qt generates the skin-retouched result.
- Affinity Photo is then used for local control with layers, masks, and opacity.
- Nik Sharpener Output applies sharpening for the final output.
I use a 16-bit PNG to transfer the image between Affinity Photo and the standalone version of G’MIC-Qt.
Of course, not every photo needs every step. For a photo that does not need portrait retouching, my existing workflow is still sufficient.
So far, I have focused on testing Easy Skin Retouch. I have not yet systematically explored the other G’MIC filters or made a thorough comparison across different portraits and output sizes.
This is therefore an exploration that has produced a practical result, rather than a final conclusion.
09 结语
我喜欢这种探索过程。
一个原本陌生的开源工具,经过安装、测试和反复对比,最终成为现有摄影流程中的一个新选项。
G’MIC 不一定能完全替代专门的人像磨皮插件,也不需要承担所有修图任务。但它提供了足够丰富的处理能力,而 Affinity Photo 又为这些效果提供了灵活的局部控制方式。
两者结合之后,我不必再把磨皮看作一个必须一次完成的步骤。
我可以先生成效果,再决定在哪里使用它、使用多少,以及如何与原始照片融合。
工具负责处理,摄影师负责判断。
这大概就是这次探索中,我最满意的收获。
备注:本文使用来自 Unsplash 的人像照片作为后期测试素材,仅用于展示磨皮工具与图层蒙版的处理过程。
ENGLISH
I enjoy this kind of exploration.
An unfamiliar open-source tool, after installation, testing, and repeated comparisons, has become a new option in my photography workflow.
G’MIC may not fully replace a dedicated portrait-retouching plug-in, nor does it need to handle every editing task. But it offers a broad range of processing tools, while Affinity Photo gives me flexible local control over their effects.
Together, they mean I no longer have to treat skin retouching as a step that must be completed all at once.
I can generate an effect first, then decide where to use it, how much to apply, and how to blend it with the original.
The tool does the processing; the photographer makes the judgment.
That is probably what I value most from this exploration.
Note: The portrait used in this article for retouching tests was sourced from Unsplash. It is included solely to demonstrate the skin-retouching tools and layer-mask workflow.